Tuesday, September 25, 2012

Invite External Users in SharePoint 2010 Online & Office 365 Step By Step

There comes a time in every site collections' life that you need to give external users access to your SharePoint 2010 Online site.

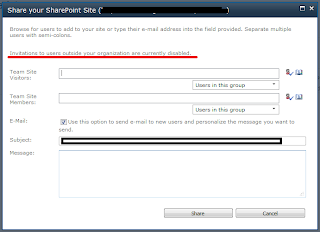
Giving access to external users is easy.

Go to your site collection and click Site Actions > Share Site


If you see Invitation to users outside your organization are currently disabled, do not worry, you are making good progress.


You first need to allow external users access to your site collections and you do this by Allowing External Users from Manage site collections page on your Sharepoint 2010 Online portal.

Note: You need to have appropriate rights to perform this operation.

Once on Manage Site Collections page, click Manage External Users under Settings button on the ribbon.
Remember not to select any site collection or Settings button will be disabled.


On the Manage External Users pop out, select Allow and press Save button.


Why are you in so much hurry? There is still one more configuration step that you need to perform. You need to enable External user invitations feature on your site collection.


Once your External users invitations feature is activated, you can perform the same steps you performed earlier to share your site with others. You got it right, Site Action > Share Site

Oops, I forgot to tell you that to activate a feature you need to go to the Features page which can be accessed by clicking Site Action > Site Settings. Look for Site collection features under Site Collection Administration and click it.

Gotchas

Your external user email address needs to be a Microsoft Online Services ID or a Windows Live ID like @live, @hotmail, @msn. If your partner does not have above mentioned id, they can always associate their ids with above services to access your shared site.

But how can they associate their ids to above services?
Do not worry, SharePoint 2010 Online already has a user friendly solution for this. Remember, you gave access to your external users by sending them an email :) 

Watchout 

I have already posted a question and to date waiting for a reply.

Office 365 and SharePoint 2010 Online Administration

It took me by surprise that there is no Central Administration in SharePoint 2010 Online but when the dust settled, I realized that this should be the case.

Anyways if there is no Administration, how can I access and do my configuration/administration was still a question to be answered.

With appropriate access rights, I visited my portal i.e. https://portal.microsoftonline.com and clicked Admin from top rightish corner of my browser.

Once on the Admin page, you will see Manage link under SharePoint heading (implies you have appropriate access rights)


Clicking on the Manage link takes you to the limited services that SharePoint 2010 Online offers.


Enjoy

Backup and Restore SharePoint 2010 Site Collection

PowerShell to the rescue again.
We have Central Administration to take care of your backup and restoration process but PowerShell commands are much more straight forward and easy to follow.

To Backup your SharePoint 2010 Site Collection
1. Fireup PowerShell.
2. Run the following command

backup-spsite -identity http://MySharePointSiteCollection:1111 -path c:\BackupFolder\1111.bak

Here -identity represents the site collection you want to backup and -path represents the fully qualified path along with the filename (with .bak extension) where you want to backup your site collection.
Once the process is complete, you will find your .bak file at the path specified.

For a complete list of options and parameters user PowerShell help

To Restore your SharePoint 2010 Site Collection
If you want to restore the backup on a different Site Collection/Web Application

If you want to restore the backup on an existing Site Collection/Web Application
1. Fireup PowerShell.
2. Run the following command

restore-spsite -identity http://MySharePointSiteCollection:1111 -path c:\BackupFolder\1111.bak


restore-spsite -identity http://contosoweb -path \\server\backupshare\backupfile.bak


Creating and Deploying Solutions in SharePoint 2010

For those who are just looking for PowerShell commands:
First you need to add your solution

Add-SPSolution c:\MySharePointSolution.wsp

Once the solution is added to your environment, install it.

Install-SPSolution –Identity MySharePointSolution.wsp –WebApplication http://MySharePointServer:1111 -GACDeployment

and we are done. Go to your site, confirm if the feature is already activated, if not, Activate it and enjoy.

For those who are looking for a more elaborate show:

Deploying your solutions into SharePoint 2010 is very easy. Its even easier if you are in your development phase and wants to deploy your solution in a development environment with Visual Studio 2010.
Here is a step by step process of creating, adding and deploying your solutions into SharePoint 2010.

When developing SharePoint Solutions, you were asked where you want to publish your solutions and you chose a sharepoint site of your choice.
In case you are wondering where that URL is stored in your Visual Studio solution, select the project from your Solution Explorer in Visual Studio 2010 and press F4, this will show you the properties for that solution.
From here you can change the URL of you site and use Visual Studio Deploy feature to deploy your solution into SharePoint site.

Situation changes when it comes to deploying your solution on a Test or Production Environment. You cannot use Visual Studio any more. If you assume that installing Visual Studio on your Test or Production servers will solve the problem, you are wrong. No such softwares should be installed on the above mentioned environments.

As now we have developed an understanding that our current solution will not work for our Test and Production Environments, our new friend Powershell comes to the rescue.