Sunday, November 18, 2012

Office Web Apps in Office 365

Microsoft Office Web Apps is a web-based version of the Microsoft Office productivity suite. It includes the web-based version of Microsoft Word, Microsoft Excel, Microsoft PowerPoint and Microsoft OneNote. The web applications allow users to access their documents directly from anywhere within a web browser as well as share files and collaborate with other users online. Supported web browsers include Internet Explorer 7 or later, Mozilla Firefox 3.5 or later, Google Chrome, and Safari 4 [wikipedia]

Although Office Web Apps is a very useful feature but I cannot demonstrate it to you because I am on a E1 plan.

You can get details of Office 365 plans from here.

I think this is the whole point on this blog ~ you cannot edit your documents inside a browser if you don't have the right plan so instead of trying to figure out how to Office Web App, first check your plan details.


Wednesday, November 14, 2012

Announcement List in Publishing Sites

It was kind of strange to learn that I cannot create an Announcement List or a Discussion Board while on my Publishing site.

Don't worry, we have a cure now.

Go go Site Actions > Site Settings. Click Manage site features under Site Actions.

Check if Team Collaboration Lists feature is activated or not. Activate it and you will have collaboration features enabled on your publishing site.

You can always set them off by deactivating this feature.

Happy team collaborating.

Monday, October 8, 2012

Save Site as Template for Publishing Sites

Today we celebrated Nick's birthday while I was working on Content Types, Document Libraries and Publishing Site features on my Office 365 SharePoint 2010 Online version.

I thought that creating site templates will be a piece of cake for me and it will be much tastier than the one I just had. But as it turned out, and as Aurelien puts it "not a piece of cake".

I was trying to create a site template for Publishing Site in SharePoint 2010 and I realized that I cannot.

Ofcourse there is a workaround.

Once you have all the customizations you want to have, go to Site Actions > Site Settings

Click Manage site features under Site Actions 

and Deactivate SharePoint Server Publishing feature.

Clicking Deactivate will take you to Warning page, click Deactivate this feature. (Dont worry, you can always re-activate it again and no love is lost)

Go back to Site Settings page and now you will see Save site as template under Site Actions
Now save this site as a template by giving it a File Name, Template Name and options Template Description.

If you want to have the content that you uploaded in document libraries or items in lists part of your template so they can be used again, click Include Content check box. Click OK to save your site template.

Site Templates in SharePoint 2010 are not .STP files any more  Moreover they are not in Site Template Gallery like MOSS 2007. Site Templates are .WSP files stored in Solution Gallery like features and webparts.

As you have already created your site template, it is of no use until you activate this template. Click Site Actions> Site Settings again.

and click Solutions under Galleries

You will see your site template. If its not already activated, activate it. Go back to your original site and enable SharePoint Publishing feature again.

Create a new site by click Site Actions> New Site. Select Blank & Custom from Categories and select your hot,  freshly baked template straight from the oven. Set a Title and decide on a URL.
Click Create.


Aaaannnnnnnnd you are done. Wooow not so fast. Remember you deactivated Publishing Feature to create this site template and as this site is created from a deactivated publishing feature site template, you have to enable it to get publishing features.

This is a very good article which gives you an idea of what you get and what you are missing if you create a site from site template.

Tuesday, September 25, 2012

Invite External Users in SharePoint 2010 Online & Office 365 Step By Step

There comes a time in every site collections' life that you need to give external users access to your SharePoint 2010 Online site.

Giving access to external users is easy.

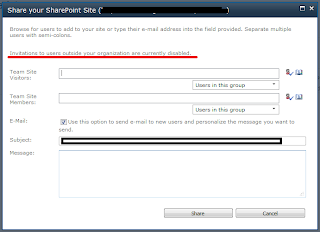
Go to your site collection and click Site Actions > Share Site


If you see Invitation to users outside your organization are currently disabled, do not worry, you are making good progress.


You first need to allow external users access to your site collections and you do this by Allowing External Users from Manage site collections page on your Sharepoint 2010 Online portal.

Note: You need to have appropriate rights to perform this operation.

Once on Manage Site Collections page, click Manage External Users under Settings button on the ribbon.
Remember not to select any site collection or Settings button will be disabled.


On the Manage External Users pop out, select Allow and press Save button.


Why are you in so much hurry? There is still one more configuration step that you need to perform. You need to enable External user invitations feature on your site collection.


Once your External users invitations feature is activated, you can perform the same steps you performed earlier to share your site with others. You got it right, Site Action > Share Site

Oops, I forgot to tell you that to activate a feature you need to go to the Features page which can be accessed by clicking Site Action > Site Settings. Look for Site collection features under Site Collection Administration and click it.

Gotchas

Your external user email address needs to be a Microsoft Online Services ID or a Windows Live ID like @live, @hotmail, @msn. If your partner does not have above mentioned id, they can always associate their ids with above services to access your shared site.

But how can they associate their ids to above services?
Do not worry, SharePoint 2010 Online already has a user friendly solution for this. Remember, you gave access to your external users by sending them an email :) 

Watchout 

I have already posted a question and to date waiting for a reply.

Office 365 and SharePoint 2010 Online Administration

It took me by surprise that there is no Central Administration in SharePoint 2010 Online but when the dust settled, I realized that this should be the case.

Anyways if there is no Administration, how can I access and do my configuration/administration was still a question to be answered.

With appropriate access rights, I visited my portal i.e. https://portal.microsoftonline.com and clicked Admin from top rightish corner of my browser.

Once on the Admin page, you will see Manage link under SharePoint heading (implies you have appropriate access rights)


Clicking on the Manage link takes you to the limited services that SharePoint 2010 Online offers.


Enjoy

Backup and Restore SharePoint 2010 Site Collection

PowerShell to the rescue again.
We have Central Administration to take care of your backup and restoration process but PowerShell commands are much more straight forward and easy to follow.

To Backup your SharePoint 2010 Site Collection
1. Fireup PowerShell.
2. Run the following command

backup-spsite -identity http://MySharePointSiteCollection:1111 -path c:\BackupFolder\1111.bak

Here -identity represents the site collection you want to backup and -path represents the fully qualified path along with the filename (with .bak extension) where you want to backup your site collection.
Once the process is complete, you will find your .bak file at the path specified.

For a complete list of options and parameters user PowerShell help

To Restore your SharePoint 2010 Site Collection
If you want to restore the backup on a different Site Collection/Web Application

If you want to restore the backup on an existing Site Collection/Web Application
1. Fireup PowerShell.
2. Run the following command

restore-spsite -identity http://MySharePointSiteCollection:1111 -path c:\BackupFolder\1111.bak


restore-spsite -identity http://contosoweb -path \\server\backupshare\backupfile.bak


Creating and Deploying Solutions in SharePoint 2010

For those who are just looking for PowerShell commands:
First you need to add your solution

Add-SPSolution c:\MySharePointSolution.wsp

Once the solution is added to your environment, install it.

Install-SPSolution –Identity MySharePointSolution.wsp –WebApplication http://MySharePointServer:1111 -GACDeployment

and we are done. Go to your site, confirm if the feature is already activated, if not, Activate it and enjoy.

For those who are looking for a more elaborate show:

Deploying your solutions into SharePoint 2010 is very easy. Its even easier if you are in your development phase and wants to deploy your solution in a development environment with Visual Studio 2010.
Here is a step by step process of creating, adding and deploying your solutions into SharePoint 2010.

When developing SharePoint Solutions, you were asked where you want to publish your solutions and you chose a sharepoint site of your choice.
In case you are wondering where that URL is stored in your Visual Studio solution, select the project from your Solution Explorer in Visual Studio 2010 and press F4, this will show you the properties for that solution.
From here you can change the URL of you site and use Visual Studio Deploy feature to deploy your solution into SharePoint site.

Situation changes when it comes to deploying your solution on a Test or Production Environment. You cannot use Visual Studio any more. If you assume that installing Visual Studio on your Test or Production servers will solve the problem, you are wrong. No such softwares should be installed on the above mentioned environments.

As now we have developed an understanding that our current solution will not work for our Test and Production Environments, our new friend Powershell comes to the rescue.

Saturday, July 21, 2012

Feature activation and deactivation

Before learning about Feature Activation and Deactivation, we need to first learn about Features.


There are few key terms that you need to remember when it comes to working with Features deployment.
1. Install
2. Activate
3. Uninstall


4. Deactivate
When working with Visual Studio, deployment a feature is as easy is right clicking your project and selecting Deploy from context menu (assuming all the default settings are in place and there are no build errors)

However you will not have the luxury of Visual Studio when it comes to either staging or production environments. You will have to do something new to deploy your features. Learn PowerShell commends.

Once you have your feature developed, tested and ready to deploy, click Start> All Programs> Microsoft SharePoint 2010 Products> SharePoint 2010 Management Shell

Install a feature
Install-SPFeature -path "MyCustomFeature"
Activate a feature
Enable-SPFeature –identity "MyCustom" -URL http://somesite
Deactivate a feature
Disable-SPFeature –identity "MyCustom" -URL http://somesite
Uninstall a feature
Uninstall-SPFeature -path "MyCustomFeature"

My personal favorite link which explains Solution deployments instead of Features is a very useful link.


Features and Solutions in SharePoint 2010

SharePoint 2010 (SharePoint Foundation 2010) which is the later version of WSS 3.0 has something called Features and Solutions. The concept is of course not now to SharePoint but I assume that it is new for the readers.
Features:
A SharePoint feature is a collection of SharePoint elements that can help a user accomplish a particular goal or task. Features can also be described as logical groups of elements that together serve a common purpose (Wrox)

Features are units of functionality which have scope, can be installed, activated, uninstalled and or deactivated from your scopes.

Scopes of a feature are
1. Farm
2. Web Application
3. Site
4. Web

A feature can be a list definition, list instance, event handler, custom navigation, a list or document library, custom master page, page layouts, application pages, custom webpart or workflows.

So a feature is a logical grouping which says when I deploy this solution make sure that the items in a feature can be deployed and activated as a single unit because they depend on each other; as I said earlier, its a unit of functionality.


To work with feature activation and deactivation, refer my next post.

Solutions:
A collection of features to be deployed in your SharePoint environment. Also known as WSP (Windows SharePoint Solution Package) which is kind of a installer for SharePoint.

You must be aware of two types of solutions in SharePoint 2010 - Sandboxed and Farm. When you first create your SharePoint projects in Visual Studio your package or your solutions (.wsp) file is dependent of the choice you made earlier while creating your project in Visual Studio.Once you have selected a project deployment type (i.e. farm or sandbox) do not worry, Visual Studio lets you change your decision if needs be.

Similar to features, Solutions too can be installed, activated, deactivated and uninstalled using Visual Studio and PowerShell  (which is introduced in SharePoint 2010 as oppose to MOSS 2007 stsadm)

To work with Solution activation and deactivation, refer to my next post.

While researching about Features and Solutions, I came across a very good post and recommend beginners to read and implement it.

Friday, July 20, 2012

SPWeb in SharePoint 2010

Often confused with a site collection within a web application, SPWeb represents an actual web site within a site collection (SPSite) which holds actual contents like pages, document libraries, lists .

At the top we have a web application, or a SPWebApplication
After SPWebApplication, we have site collection or site or SPSite
In each site collection we have web sites or SPWeb
In each of these sites we can have more sub sites also called SPWeb.


Lets see what our object model representation is in terms of Central Administration
1. When you click New under Central Administration>Application Management> Manage web applications, you are dealing with SPWebApplication. While creating a web application, you select Authentication type, port, host header and other settings.

2. When you click Create site collections under Central Administration> Application Management, you are dealing with SPSite (you select a web application to create site collection in it). While creating a site collection, you select an existing web application and choose site templates.

3. When you click New Site under Site Actions from your site, you are dealing with SPWeb. While creating a web site, you select a from available templates, title and url

SPSite object can be obtained in many ways. For example

SPSite siteCollection = new SPSite("SITE COLLECTION URL");
SPWeb web = SPContext.Current.Web;

SPSite siteCollection2 = new  SPSite("SITE COLLECTION URL");
SPWeb web2 = siteCollection2.OpenWeb("WEB URL");

SPSite siteCollection3 = new  SPSite("SITE COLLECTION URL");
SPWEB web3 = siteCollection3.RootWeb
******************************************************
Sample Code
using (SPSite ositeCollection = new SPSite(SITE URL))
            {
                using (SPWeb oweb = ositeCollection.RootWeb)
                //using (SPWeb oweb = ositeCollection.OpenWeb("PressReleases"))
                {
                    Console.WriteLine("Is Root Web: " + oweb.IsRootWeb);
                    Console.WriteLine("Master URL: " + oweb.MasterUrl);
                    Console.WriteLine("Name: " + oweb.Name);
                    Console.WriteLine("Site Port: " + oweb.Site.Port);
                    Console.WriteLine("Theme: " + oweb.Theme);
                    Console.WriteLine("Title:" + oweb.Title);
                    oweb.Title = "New Title";
                    oweb.Update();
                    Console.WriteLine("Title:" + oweb.Title);
                    Console.WriteLine("User is Web Admin: " + oweb.UserIsWebAdmin.ToString());
                    Console.WriteLine("Web Template: " + oweb.WebTemplate);
                    foreach (SPUser user in oweb.AllUsers)
                    {
                        Console.WriteLine("User Login Name: " + user.LoginName);
                    }

                    string templateName = "Test Site";
                    string templateTitle = "Test Template";
                    string templateDesc = "This template was saved programmatically.";
                    Console.WriteLine("Save as template");
                    oweb.SaveAsTemplate(templateName, templateTitle, templateDesc, false);
                    Console.WriteLine("Saved");
                }
                //Console.WriteLine("Start Creating site from code. Should run only once");
                //ositeCollection.RootWeb.Webs.Add("FromCode");
                //ositeCollection.RootWeb.Update();
                //Console.WriteLine("Site Created");
                //using (SPWeb oweb = ositeCollection.OpenWeb("FromCode"))
                //{
                //    Console.WriteLine("Is Root Web: " + oweb.IsRootWeb);
                //    Console.WriteLine("Master URL: " + oweb.MasterUrl);
                //    Console.WriteLine("Name: " + oweb.Name);
                //    Console.WriteLine("Site Port: " + oweb.Site.Port);
                //    Console.WriteLine("Theme: " + oweb.Theme);
                //    Console.WriteLine("Title:" + oweb.Title);
                //    Console.WriteLine("User is Web Admin: " + oweb.UserIsWebAdmin.ToString());
                //    Console.WriteLine("Web Template: " + oweb.WebTemplate);
                //    Console.WriteLine("Lists Collection");
                //}
            }

It is also available in SandBoxed solutions.

Related Links
SPContext
SPSite

SPSite in SharePoint 2010

Often confused with a site within a site collection, SPSite represents a collection (including top level web site annd all its sub sites. not a site.

At the top we have a web application, or a SPWebApplication
After SPWebApplication, we have site collection or site or SPSite
In each site collection we have web sites or SPWeb
In each of these sites we can have more sub sites also called SPWeb.


Lets see what our object model representation is in terms of Central Administration
1. When you click New under Central Administration>Application Management> Manage web applications, you are dealing with SPWebApplication. While creating a web application, you select Authentication type, port, host header and other settings.
2. When you click Create site collections under Central Administration> Application Management, you are dealing with SPSite (you select a web application to create site collection in it). While creating a site collection, you select an existing web application and choose site templates.
3. When you click New Site under Site Actions from your site, you are dealing with SPWeb. While creating s web site, you select a from available templates, title and url


SPSite object can be obtained in many ways. For example

SPSite siteCollection = new SPSite("SITE COLLECTION URL");
SPSite siteCollection = SPContext.Current.Site;
******************************************************
Sample Code
using (SPSite oSiteCollection = new SPSite(SITE URL))
            {
                Console.WriteLine("All Webs Count: " + oSiteCollection.AllWebs.Count.ToString());
                Console.WriteLine("Content Database Name: " + oSiteCollection.ContentDatabase.Name);
                Console.WriteLine("Features Counts: " + oSiteCollection.Features.Count.ToString());
                Console.WriteLine("Host Name: " + oSiteCollection.HostName);
                Console.WriteLine("Owner Login Name: " + oSiteCollection.Owner.LoginName);
                Console.WriteLine("Root Web Exists: " + oSiteCollection.RootWeb.Exists.ToString());
                Console.WriteLine("URL: " + oSiteCollection.Url);
                Console.WriteLine("Web Application Application Pool Name: " + oSiteCollection.WebApplication.ApplicationPool.Name);
            }

It is also available in SandBoxed solutions.

Related Links
SPContext
SPWeb

SPContext in SharePoint 210

Before discussing what SPContext is, we need to understand what a Context is.
As stated by free dictionary, context means :The circumstances in which an event occurs.
So if we take things in context and try to dig deeper in SPContext in SharePoint 2010 or any other version, it represents a context of your HTTP Request in Microsoft SharePoint Foundation.

SPContext object is used in your custom code like custom web parts and it returns context information in which your code is running.

For example you need to read some items from a list. There are 2 ways to do it. Either hard code the url to get to your Web Application/Site Collection/List or use SPContext to get the required object and use it accordingly.

Once you deploy your custom webpart in your web application and try to use it on a page, this site/site collection/web application becomes your context because your code in running inside this context.

The most important members of SPContext is Current
Once you get current context, you can use further members of the class

SPWeb web = SPContext.Current.Web;
SPSite site = SPContext.Current.Site;
SPList list = SPContext.Current.List;
SPListItem listItem = SPContext.Current.Item;

One important thing is that it is also available in SandBoxed solutions

Related Links
SPSite
SPWeb

Saturday, February 18, 2012

CAML Query Where Criteria for Boolean type columns

Interestingly enough, boolean type columns can either be used as Integer or Boolean values and heres how its done.
string CAMLQuery = "<Where> <Eq><FieldRef Name='Online'/> <Value Type='Integer'>1</Value></Eq> </And> </Where>" ;
or
string CAMLQuery = "<Where> <Eq><FieldRef Name='Online'/> <Value Type='Boolean'>True</Value></Eq> </And> </Where>" ;
where TRUE, True, true are all possible values

CAML Query Where Criteria for Date type columns and date formats

When I started writing a CAML query which involved checking against a certain date in a date time type column in one of my list, I thought that it would be as simple as

string CAMLQuery ="<Where>"+ "<And>"+ "<Leq>FieldRef Name='Start_x0020_Date'/>"+ "<Value Type='DateTime'>" + DateTime.Now + "</Value></Leq>"+ "<Geq><FieldRef Name='End_x0020_Date'/>"+ "<Value Type='DateTime'>" + DateTime.Now + "</Value></Geq>"+ "</And>" + "</Where>";

assuming that it will return me results where Start Date is less than today and End Date is greater than today meaning that everything that needs to be shown today will come up but as it turned out it was not the case.
CAML Queries expects a certain datetime format when it comes to use them in WHERE Clauses.
You can use a complex

SPUtility.CreateISO8601DateTimeFromSystemDateTime(DateTime.Now)

or you can use

String.Format("{0:s}", DateTime.Now)

which results in

string CAMLQuery ="<Where>"+ "<And>"+ "<Leq>FieldRef Name='Start_x0020_Date'/>"+ "<Value Type='DateTime'>" + String.Format("{0:s}", DateTime.Now) + "</Value></Leq>"+ "<Geq><FieldRef Name='End_x0020_Date'/>"+ "<Value Type='DateTime'>" + String.Format("{0:s}", DateTime.Now) + "</Value></Geq>"+ "</And>" + "</Where>";

One of the solutions I found on internet was to use an Offset, something like

string CAMLQuery = "<Where> <Geq> <FieldRef Name='MyDateColumn' /> <Value Type='DateTime> <Today OffsetDays='-5' /> </Value> </Geq> </Where>";

which means 5 days less than today.
You might also be interested in IncludeTimeValue attribute which can a TRUE or a FALSE value